Connect AWS (CloudFormation)
Deploy the generated CloudFormation template, choose organization or single account and optional features, then verify.
Connect AWS (CloudFormation)
Give CostGlass read-only access to your AWS bill by deploying one CloudFormation template that CostGlass generates for you.
- You deploy one template in AWS region us-east-1. It creates a Cost and Usage export, an S3 bucket for it, and a role named CostGlassCURReader that only CostGlass can assume.
- Choose AWS Organization (deploy once in the management account, member accounts follow) or Single account.
- Instance Scheduler, Rightsizing and Uptime are optional. A feature you do not tick is left out of the template completely.
- Only Instance Scheduler can change anything in your account (start and stop). Everything else is read-only.
- AWS needs up to 24 hours to deliver the first export. CostGlass picks it up automatically.
- A login to AWS. For an AWS Organization, the management (payer) account. For a single account, the account that pays the bill.
- Permission in AWS to create CloudFormation stacks that contain IAM resources (named IAM resources).
- For an Organization: CloudFormation StackSets trusted access enabled (a one-time step, explained below).
- Spare capacity in your plan. See the connection limits in the overview.
How the connection works
CostGlass never asks for an AWS access key. Instead, the template creates an IAM role in your account. A role is a set of permissions that a trusted outsider can borrow for a short time. The role trusts only the CostGlass AWS account, and only when it presents your External ID.
- External ID
- A long random secret generated for this one connection. The role refuses anyone who does not present it. It stops another AWS customer from tricking CostGlass into reading your account.
- Cost and Usage export (CUR)
- AWS Billing writes a detailed file of every charge, hourly, to an S3 bucket in your account. CostGlass reads those files. This is how your cost data arrives.
- StackSet
- A CloudFormation feature that rolls the same stack out to many accounts. The Organization template uses one to create the member-account role.
What the template creates:
| Resource | Name | Purpose |
|---|---|---|
| S3 bucket | costglass-cur-exports-<your account ID> | Receives the export. Encrypted, all public access blocked. A bucket policy lets AWS Billing write to it. |
| Cost and Usage export | CostGlassCURExport | Hourly, with resource IDs, CSV compressed with gzip, into the folder cur. |
| IAM role | CostGlassCURReader | The role CostGlass assumes. Trusts the CostGlass account and your External ID. |
| Organization only: StackSet | CostGlass-Organization-Member-Roles | Creates a role named CostGlassReadOnly in every member account, including accounts that join later. |
Connect AWS, step by step
Cloud Accounts → AWS. The same wizard also appears on the first-run screen.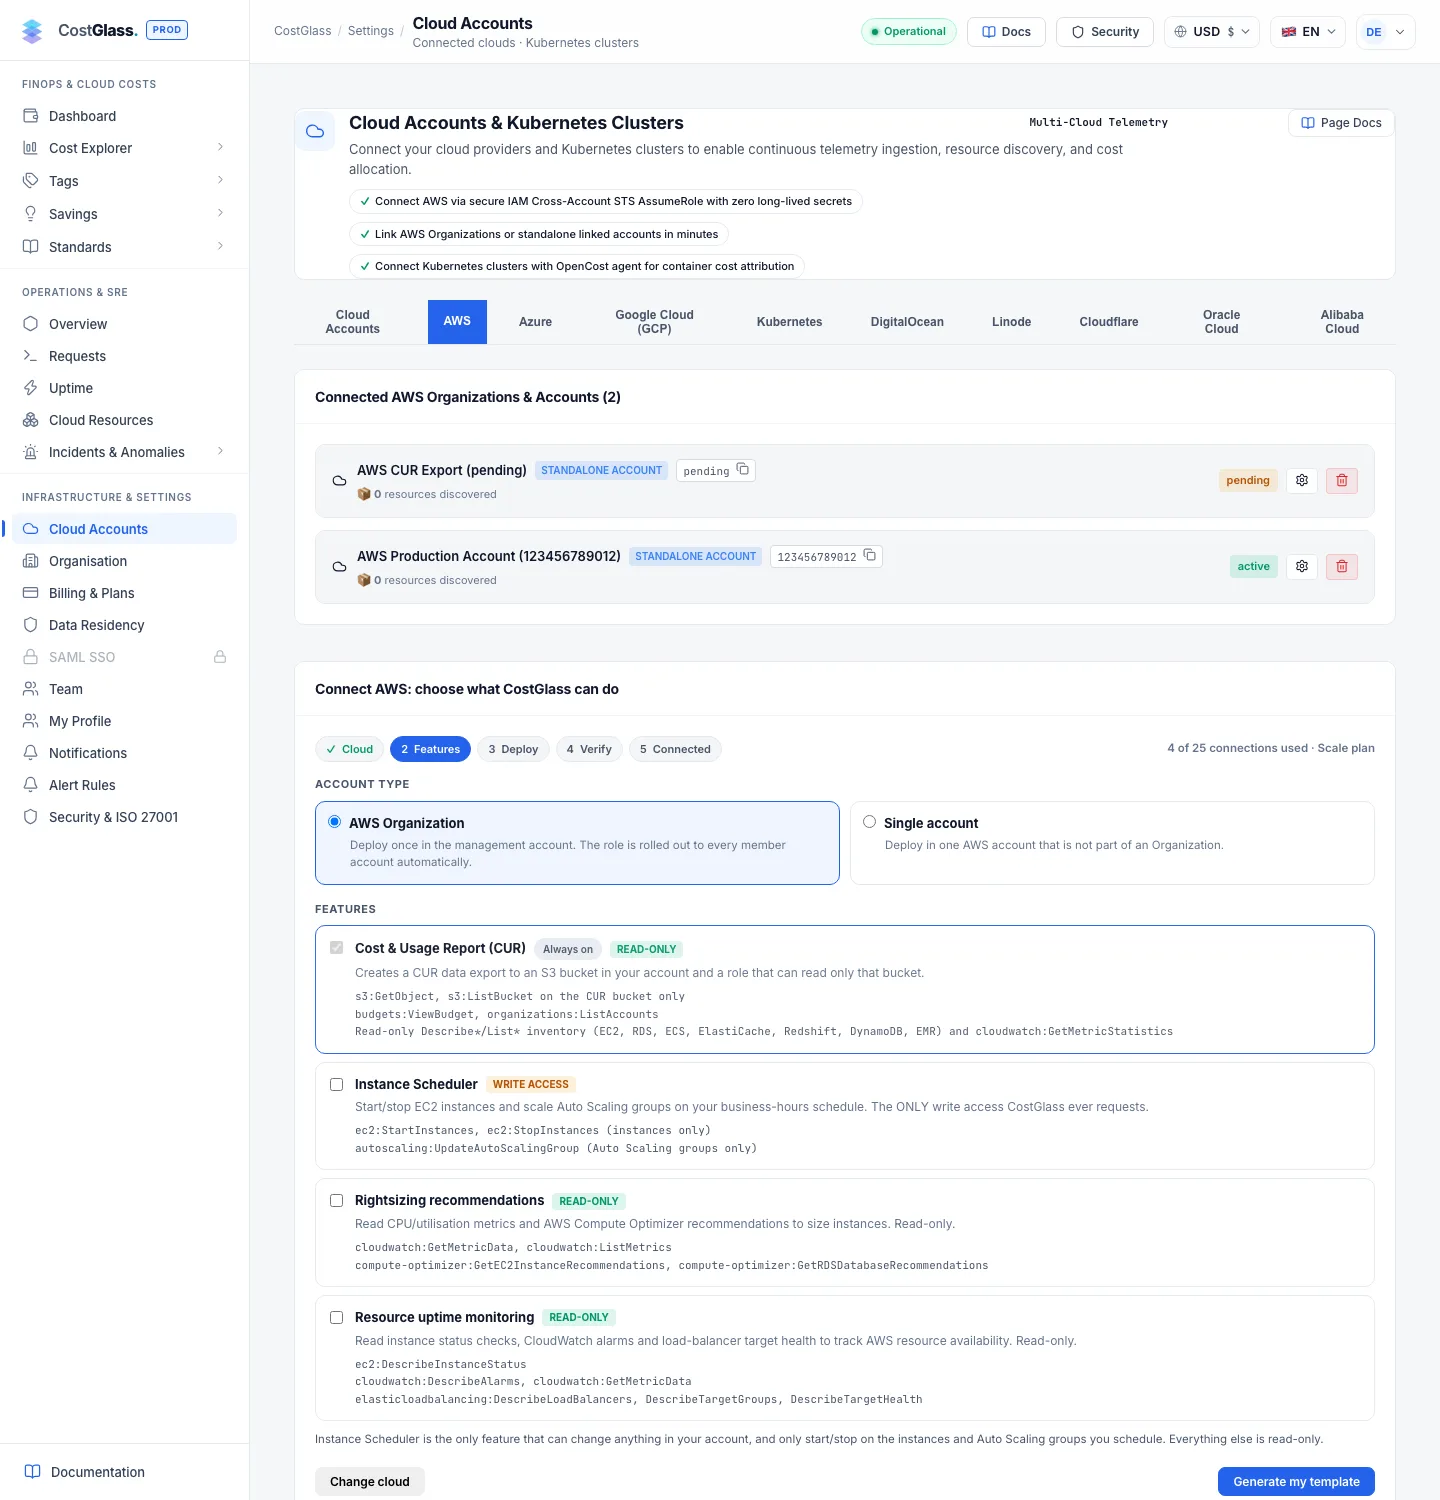
CAPABILITY_NAMED_IAM), and create the stack. Wait for CREATE_COMPLETE, usually three to five minutes.RoleArn and BucketName.The verify form
| Field | What to enter | Default |
|---|---|---|
| Name for this integration (optional) | A label you will recognise, for example "Acme production organisation". | AWS CUR Export (<account ID>) |
| Role ARN (Outputs: RoleArn) | The RoleArn output. Looks like arn:aws:iam::123456789012:role/CostGlassCURReader. | None |
| S3 bucket (Outputs: BucketName) | The BucketName output. | None |
| Prefix | The folder inside the bucket. | cur/ |
| Region | The region of the bucket. | us-east-1 |
CostGlass assumes the role with your External ID and lists the bucket before saving. A typo is rejected here, not a day later.
What you see afterwards
The wizard moves to AWS connected and shows one of these messages:
| Message | Meaning |
|---|---|
| Synced N records from M file(s). | Data has already arrived. |
| The first import is running in the background. Your data will appear in a few minutes. | A large export is being read in stages. Nothing for you to do. |
| Connected. AWS has not delivered the first export yet... | Normal on a new setup. Up to 24 hours. CostGlass checks again every 6 hours. |
| The bucket could not be read yet: ... | Read the reason, then see the FAQ below. |
Check delivery now runs the check immediately. Integrate another starts a fresh connection.
What each feature adds
Permissions are listed exactly as the template grants them.
| Feature | Access | Permissions added |
|---|---|---|
| Cost & Usage Report (always) | Read-only | s3:GetObject and s3:ListBucket on the export bucket only; budgets:ViewBudget; organizations:ListAccounts; read-only Describe and List calls for EC2, Elastic IPs, snapshots, volumes, load balancers, RDS, ECS, ElastiCache, Redshift, DynamoDB and EMR; cloudwatch:GetMetricStatistics; iam:SimulatePrincipalPolicy. |
| Instance Scheduler | Write | ec2:StartInstances and ec2:StopInstances on instances; autoscaling:UpdateAutoScalingGroup on Auto Scaling groups. |
| Rightsizing recommendations | Read-only | cloudwatch:GetMetricData, cloudwatch:ListMetrics; compute-optimizer:GetEC2InstanceRecommendations, compute-optimizer:GetRDSDatabaseRecommendations. |
| Resource uptime monitoring | Read-only | ec2:DescribeInstanceStatus; cloudwatch:DescribeAlarms, cloudwatch:GetMetricData; elasticloadbalancing:DescribeLoadBalancers, DescribeTargetGroups, DescribeTargetHealth. |
Organization stacks also create the member-account role CostGlassReadOnly in each member account with the read-only inventory permissions and the features you ticked.
Organization or single account?
The Organization template has two extra parameters you can change at deploy time: AutoDeployNewAccounts (default true) and RetainOnAccountRemoval (default false).
Cost and Usage export: the 24 hour wait
The export is created as soon as the stack finishes, but AWS writes the first file in its own time, up to 24 hours later. Until then CostGlass is connected but has no data. From the dashboard you can use Fetch data now for a one-off pull from Cost Explorer; AWS charges $0.01 per request and the button states the cost before you confirm.
After the first delivery CostGlass reads new files every 6 hours.
Removing access
Updating the stack later
- Switch a feature off: update the stack and set its parameter to
false(EnableInstanceScheduler,EnableRightsizingorEnableUptimeMonitoring). - Add a feature you did not tick: an unticked feature is not in the template at all, so a parameter cannot turn it on. The wizard builds templates for new connections; it does not offer a way to change the features of one that is already active. Contact CostGlass support for that.
- When CostGlass adds new read-only checks it may need new permissions. Then redeploy the stack (or update the Organization StackSet). For example, the unused Elastic IP and idle load balancer checks need
ec2:DescribeAddressesandelasticloadbalancing:Describe*. Until you do, that check finds nothing and says so on the Savings page.