Setting up your organisation hierarchy
Build a tree of nodes, place cloud accounts by hand, rule or CSV, and scope people to a branch.
Setting up your organisation hierarchy
Arrange your cloud accounts into a tree that matches how your company is organised, see spend and resources roll up at every level, and limit people to their own branch.
- The hierarchy is your own tree of nodes (called OUs on screen, for example "Engineering" or "Payments"). It is independent of the structure inside each cloud.
- Every connected cloud account (an AWS account, an Azure subscription, a Google Cloud project and so on) sits in exactly one node.
- You can place accounts by hand, with rules, or by uploading a CSV. New accounts wait at the top of the tree until you place them.
- Each node shows monthly spend, account count and resource count for itself and everything below it.
- You can bind a person to a node so they only see that part. Some pages cannot be narrowed this way and always show the whole organisation.
- At least one cloud account connected. See Connect your clouds.
- A rough idea of the structure you want. If you are unsure, read Designing your hierarchy first.
- A list of which account belongs to which team (a spreadsheet is ideal if you have many accounts).
What the hierarchy is
- Node (shown as OU or Department OU)
- One box in your tree, such as a business unit, a team or an environment. A node can contain other nodes (sub-units) and cloud accounts.
- Root
- The top of the tree. Every organisation has exactly one. It is labelled Enterprise Root and is named after your organisation. It cannot be deleted or moved.
- Native account
- A billing or ownership unit inside a cloud: an AWS account, an Azure subscription, a Google Cloud project, an Oracle tenancy, an Alibaba account, a DigitalOcean, Linode or Cloudflare account. These are what you place in the tree.
- Rollup
- The totals shown for a node: they add up the node itself and everything beneath it.
- Scoped access
- Binding a person to a node so they only see accounts under that node.
The hierarchy is separate from AWS Organizations, Azure Management Groups and similar structures. CostGlass does not read those layouts. You decide the tree, and it can combine accounts from different clouds in one place.
Open the page and find your way around
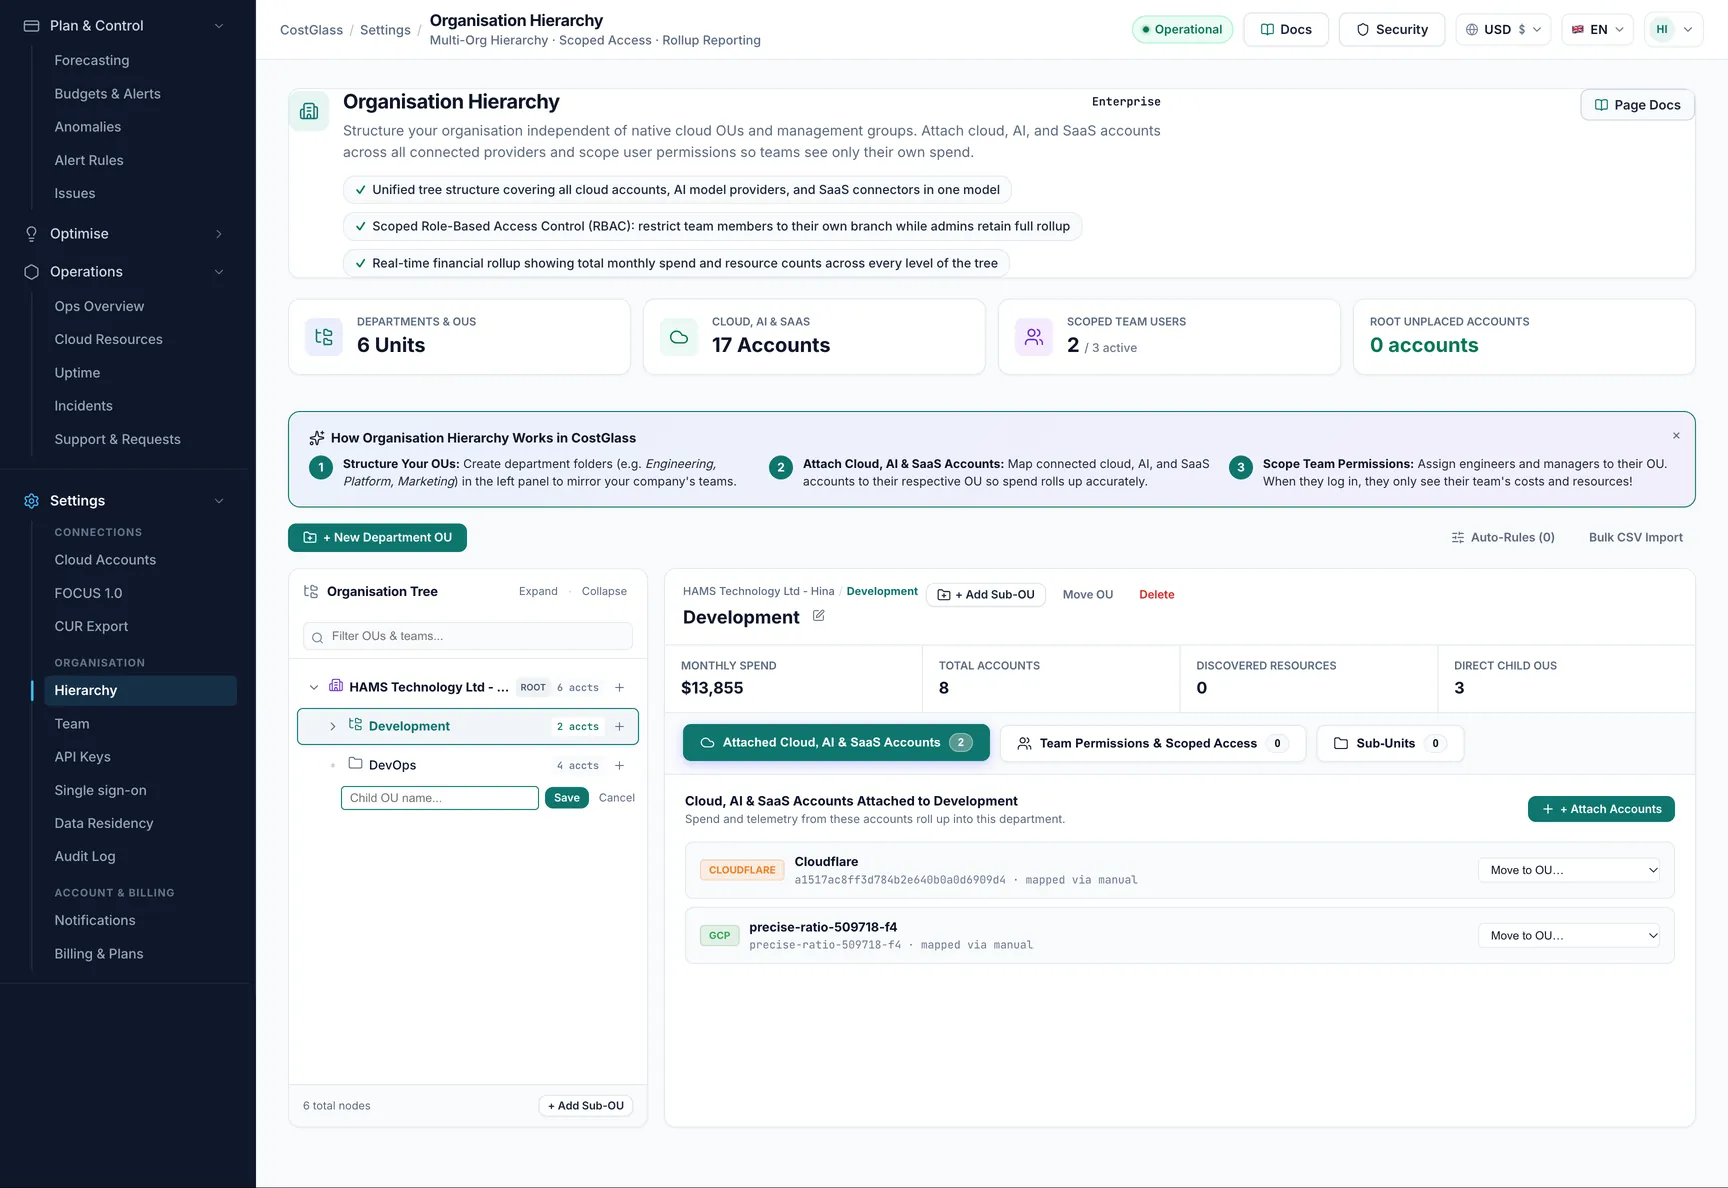
Create and organise nodes
Place accounts in nodes
An account belongs to exactly one node. Placing it somewhere new moves it. There are three ways to do it, and you can mix them.
1. By hand
2. All the unplaced accounts at once
When a new account is connected it lands on the root until you place it. The card Root Unplaced Accounts counts them. Click Assign All → or Unassigned Accounts (n), choose a Target Destination OU, tick the accounts and click Assign n Accounts.
3. With rules (Auto-Rules)
A rule says "send every account that matches this to that node". Click Auto-Rules (n) to open the Auto-Assignment Rules drawer and fill Add New Assignment Rule:
| Field | What it does | Options |
|---|---|---|
| Rule Name | A label for you. | Free text, for example "Route Prod". |
| Destination OU | The node matching accounts go to. | Any node. |
| Priority | Rules are tried from the lowest number to the highest; the first match wins. | A number. The default is 100. |
| Field | What to look at on the account. | Provider, Display Name, Account ID. |
| Operator | How to compare. | equals, contains, starts with. |
| Match Value | The text to compare with (not case sensitive). | Free text. |
Click Add Rule, then click Run Rules Now to apply the rules. Rules only run when you click that button.
4. With a CSV file (Bulk CSV Import)
Click Bulk CSV Import. The drawer Bulk Hierarchy CSV Import explains the format. The file needs a header row with
- Choose the file and click Upload & Build Tree.
- CostGlass creates any missing nodes (re-using ones that already exist with the same name under the same parent) and places each account.
- The result says how many accounts were mapped and how many were skipped, with the reason for each (at most the first 50 are listed).
Read the rollup numbers
| Number | What it means |
|---|---|
| Monthly Spend | Spend for the current calendar month so far, for every account under the node. It is shown in the fixed-rate unit the rest of the app uses for stored costs, so it can differ slightly from a figure converted at today's exchange rate. |
| Total Accounts | How many accounts sit under the node, including its sub-units. |
| Discovered Resources | Resources found in those accounts that are not terminated. |
| Direct Child OUs | How many nodes are immediately under this one. |
Limit people to their branch (Team Access)
A person who is not scoped sees the whole organisation. One person can be bound to one node at a time.
Which pages respect scope
When a person is scoped, these pages and tools show only the accounts under their node: the Dashboard, Cost Explorer, Reports, Resources, Anomalies, Budgets, Savings, Rightsizing, Commitments, Tag Explorer, Tag Compliance, Virtual Tagging and Unit Economics.
- Cloud Spend (the combined cloud view), Forecasting summaries and Kubernetes Costs combine spend across the organisation and have no per-account breakdown to filter, so scope does not narrow them.
- Spend from SaaS and AI vendors is not tied to an account, so a scoped person does not see their anomalies.
If a figure must be hidden from someone, do not rely on scope alone. Check these pages as that person.
Who can edit the hierarchy
A worked example
- Create two nodes under the root: Payments and Growth.
- Connect your accounts. They appear under Root Unplaced Accounts.
- Create a rule: Field Display Name, operator contains, value pay, destination Payments. Click Add Rule then Run Rules Now.
- Select Growth, click + Attach Accounts and attach the remaining account by hand.
- Select Payments, click + Scope Team Member and choose the Payments lead. They now see only the Payments accounts.
The names are illustrative.