Sign up, connect a first cloud, invite your team, set a budget and turn on anomaly alerts, with a first-week checklist.
Quickstart: your first hour
Go from a new account to real spend, a budget, anomaly alerts and a weekly summary email, with a checklist for the first week.
Where in CostGlassStart at costglass.com
PlanAll plans
Who can do thisOwner or admin for most steps
Time neededAbout one hour, mostly waiting for the first data
In short
- Sign up, pick your data region (fixed for good), then connect one cloud. Connecting is the only step that needs access to your cloud console.
- The first data usually appears within about six hours. If you do not want to wait, use Fetch data now on the Dashboard.
- Invite teammates under Settings → Team, create a monthly budget, and turn on anomaly notifications so problems find you.
- The weekly spend summary email is on by default. It arrives on Mondays.
- Come back after a week to review the first full picture: the checklist at the end tells you what to look at.
Before you begin
- A work email address (or a Google account) to sign up with.
- For the cloud you want to connect: someone who can create the access it needs. For AWS that means permission to create a CloudFormation stack with IAM resources; for AWS Organizations, the management account. Each provider's guide lists exactly what is required.
- Optional: a Slack incoming webhook or a Microsoft Teams webhook if you want alerts in chat. Email works without either.
Step 1: sign up and choose your region
1
Open costglass.com and choose Sign up
You will see the region picker, titled Where should your data live?. It lists the regions that are open and marks the default.
2
Pick a region
Everything for your organisation (cloud data, users and settings) is stored and processed there.
This cannot be changed later without a migration. If you are unsure, pick the region closest to your team or the one your data rules require. See
Data residency.
3
Create the account on your region's site
You are taken to your region's own site. Choose a plan under Choose Plan, then enter Full name, Company name and either use Sign up with Google or give an Email and Password. The button creates your organisation and makes you its owner.
4
Confirm your email
If you used email and password, enter the verification code that is emailed to you. If it does not arrive, use Didn't receive code? Resend.
Note
Paid plans start with a 14-day trial; the Free plan has no trial period because it is free. You can change plan later under Settings → Billing & Plans.
Were you invited instead?
If a colleague invited you, do not create a new organisation. Sign in with the email address that was invited (an invitation email with a temporary password is sent), and you join their organisation. If you see a message that you need to ask an admin to invite you, your email has not been invited yet.
Step 2: connect your first cloud
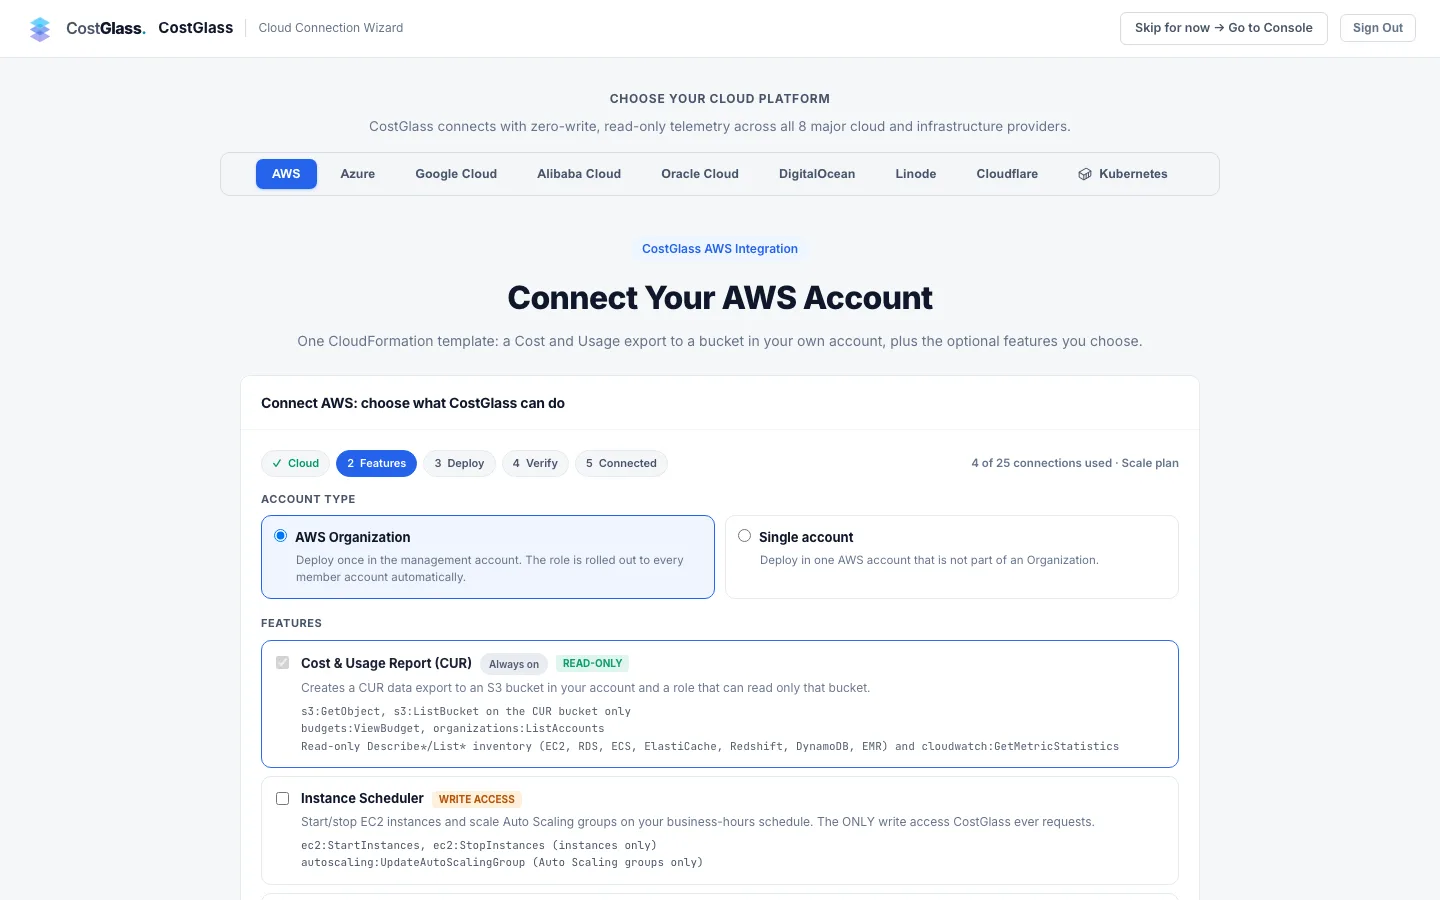
Straight after sign-up you land on the Cloud Connection Wizard (Choose Your Cloud Platform). You can click Skip for now → Go to Console and come back, but the dashboards stay empty until something is connected.
1
Choose a platform
Pick AWS, Azure, Google Cloud, Oracle, Alibaba, DigitalOcean, Linode or Cloudflare. For AI and SaaS vendors (OpenAI, Anthropic, Datadog, Snowflake) and Kubernetes clusters, connect them later from SaaS & AI Spend and Settings → Cloud Accounts.
2
Follow that cloud's wizard
The AWS wizard has five steps: Cloud, Features, Deploy, Verify, Connected. You generate a template, deploy it in your account, paste the outputs back and click verify. The guide for your cloud, linked from
Connect your clouds, walks through every click.
3
Wait for the Connected step
CostGlass checks the access works before it marks the connection active. A bad token or role is rejected with the provider's own message, and nothing is stored.
Plan limits apply
Each plan allows a set number of connections (Free 1, Starter 3, Growth 10, Scale 25, Enterprise unlimited). Going over shows an upgrade prompt instead of connecting.
Prefer Terraform? See Connect AWS with Terraform.
The Cloud Connection Wizard shown after sign-up.Step 3: what happens next, and Fetch data now
Once a connection is active, CostGlass collects data on a schedule, roughly every six hours. The first collection pulls your history, so it can take longer than the later ones.
| Source | What to expect for the first data |
|---|
| AWS (Cost and Usage Report) | AWS delivers the first report file within up to 24 hours of the export being created. Until then the connection shows as connected but waiting. |
| AWS (live Cost Explorer connections) | The next scheduled run, or sooner if you use Fetch data now. |
| Azure, Google Cloud, Oracle, Alibaba | Collected on the scheduled runs after verification. Oracle and Alibaba depend on when the provider delivers its first report, which can take up to a day. |
| DigitalOcean, Linode, Cloudflare | A first sync runs when you connect. These providers expose invoices or usage, not a daily export, so history is limited to what they offer. |
| OpenAI, Anthropic, Datadog, Snowflake | Data appears after the first sync; each connection card has its own Sync button. |
Fetch data now
If a cloud is connected but the Dashboard still shows no spend, a card titled No cost data yet appears with a Fetch data now button.
1
Click Fetch data now
CostGlass first checks what the fetch would cost and shows Confirm on-demand data fetch.
2
Read the estimate
For AWS connections that call the live Cost Explorer API, AWS bills a small fee per request (the card lists the amount, up to a handful of requests). Connections that read a Cost and Usage Report from your bucket cost nothing to fetch.
3
Click Confirm & Fetch
The dashboard fills in once the fetch completes. Click Cancel to do nothing and wait for the schedule instead.
Note
If nothing appears after a day, see
Troubleshooting. The Cloud Accounts page shows each connection's last sync and any error.
Step 4: invite your team
1
Open Settings → Team
In the sidebar choose Settings, then Team. Only owners and admins can invite.
2
Click Invite Teammate
Enter Work Email Address and Full Name, choose a role, and click Send Invitation.
3
Choose the right role
Admin can manage connections, budgets and alerts. Member can view data. Invitations can only create admins or members; there is one owner role, held by whoever created the organisation, and an owner can promote others later.
The teammate receives an email with a temporary password (or signs in with Google using that same address). To limit someone to part of your spend, see Organisation hierarchy. More in Team and access.
Step 5: set a budget
A budget gives you an early warning before spend runs past a limit.
1
Open Plan & Control → Budgets & Alerts
Click Create Budget.
2
Name it and set the limit
Enter Budget Name and Monthly Limit in your display currency. Billing Period can also be quarterly or annual.
3
Choose its scope
Leave Cloud Provider on the all-clouds option for a company-wide limit, or narrow it by provider, account or service. This is optional: start broad.
4
Check the alert thresholds
Alert Thresholds (% of Limit) decides when you are warned, for example at 80% and 100%.
5
Click Create Budget
The budget card shows month-to-date spend, the projected month-end and a status such as On Track or Exceeded.
A sensible first budget
For example, if last month's total was about 10,000, a first company-wide monthly budget of 11,000 with alerts at 80% and 100% gives you a buffer for normal growth while still catching a real overrun. Adjust once you have seen a full month.
See Budgets for scoping by account, service or virtual tag.
Step 6: turn on anomaly notifications
CostGlass looks for days when a service cost unusually more than its normal pattern (an anomaly) and can notify you. Notification rules are keyed by the extra daily spend, for example "greater than a set amount".
1
Open Plan & Control → Anomalies
Scroll to Anomaly Notification Rules by Threshold.
2
Click + Add Rule
Enter a dollar threshold in the Add rule dialog and click Continue. A rule applies when an anomaly's extra spend per day is above the threshold; you can use a percentage instead.
3
Add a channel
In New anomaly notification rule add email, Slack, Microsoft Teams or PagerDuty destinations and click Save Rules. Use the test button on a rule to check it arrives. A PagerDuty test creates a real incident.
Important
Only the highest matching rule notifies for each anomaly. If you want a bigger anomaly to reach a channel as well, add that channel to the higher rule too. Only owners and admins can change rules.
Full details in Anomaly detection and Alerts overview.
Step 7: the weekly summary email
CostGlass can email a spend summary each week comparing the last seven days with the seven before. It is switched on by default for email.
- It is sent on Mondays. Only people who already had an account on the Monday before receive it, so a new account's first summary arrives on the following Monday.
- Under Settings → Notifications you can untick Weekly Spend Summary, choose Delivery Channels (email, Slack, Microsoft Teams), add a webhook URL and click Save Preferences. A preview shows what each channel will look like.
- There is also a monthly rollup option on the same page, sent on the first of the month.
- If no spend has been recorded yet, no summary is sent.
See Notifications.
Your first-week checklist
| When | Do this | Why |
|---|
| Day 1 | Connect one cloud, check the Dashboard fills in (use Fetch data now if not). | Confirms access works end to end. |
| Day 1 | Invite two or three teammates and pick their roles. | Others can see the same numbers and respond to alerts. |
| Day 1 | Create a company-wide monthly budget. | A limit and an early warning. |
| Day 2 | Add an anomaly notification rule with a Slack or email channel, and test it. | Problems come to you. |
| Day 2-3 | Open Cloud Resources and look at the biggest and the stopped or untagged items. | Finds obvious waste and ownership gaps. |
| Day 3 | Read Savings and note the top two recommendations with their basis. | The quickest wins. |
| Day 4 | Connect the next cloud or vendor, and decide a tagging convention. | A fuller picture and clean allocation. |
| Day 5 | Customise your Dashboard and, if useful, build a shared one for your team. | One page your team agrees on. |
| Day 7 | Read your first weekly summary email and compare it with the Dashboard. | Confirms the numbers match what you expect. |
I skipped the connection step. How do I get back to it?
Go to Settings → Cloud Accounts. The same wizard is there. See
Manage accounts.
The Dashboard is empty and there is no Fetch data now card.
The card only appears when a cloud is connected but no spend has been recorded. If no connection is active yet, finish the wizard first. If the connection is active, check its status on the Cloud Accounts page.
Can I try CostGlass without connecting my own cloud?
The app shows only your own organisation's data, so there is no sample mode in a real account. The screenshot tour shows every page with sample data.
Who receives the weekly summary?
Each user who has summaries on and an existing account. The setting is per user, under Settings → Notifications.
Did I choose the wrong region?
The region cannot be changed. Create a separate organisation in the region you want, and connect your clouds there.