Single sign-on (SAML & OIDC)
Connect Okta, Entra ID, Google Workspace or another provider, verify your domain, test and require SSO.
Single sign-on (SAML & OIDC)
Let your team sign in to CostGlass with the account they already use at work, through your own identity provider.
- Works with SAML 2.0 and OpenID Connect (OIDC), for example Okta, Microsoft Entra ID, Google Workspace, OneLogin, Auth0 and Keycloak.
- You prove you own your email domain with a DNS TXT record, test the sign-in once, then switch it on.
- People must be invited first. Single sign-on lets an invited person sign in through your company login; it never creates accounts.
- You can then require it, so passwords and Google sign-in stop working for people on your domain. One Owner keeps password sign-in as the break-glass account.
- Changing your provider details resets the test and the requirement, so a mistake cannot lock anyone out.
- Your organisation is on the Scale or Enterprise plan. On other plans the page shows an upgrade message.
- You are an Owner or Admin of your CostGlass organisation.
- You can create an application in your identity provider (usually an administrator role there).
- You can add a DNS TXT record for your email domain, or know who can.
- The people who will use it are already invited under Settings → Team.
How it works
An identity provider (IdP) is the service your company uses to sign people in, such as Okta or Microsoft Entra ID. SAML 2.0 and OpenID Connect are the two standard ways it can tell CostGlass "this person has signed in, and this is their email".
- You create an application for CostGlass in your IdP, using values CostGlass shows you.
- You give CostGlass your IdP's details.
- You prove you own your email domain.
- An Owner or Admin signs in once through the IdP as a test.
- You switch it on. From then on, the sign-in page recognises your domain: after someone types their work email it offers Continue with SSO.
- Optionally you require it for everyone on the domain.
One organisation can have one identity provider and up to 10 email domains, each proven separately. A sign-in only counts when it comes from your own organisation's provider and the email is on one of your verified domains. A different organisation's provider cannot sign in as your people, even if it names their email address.
Set it up, step by step
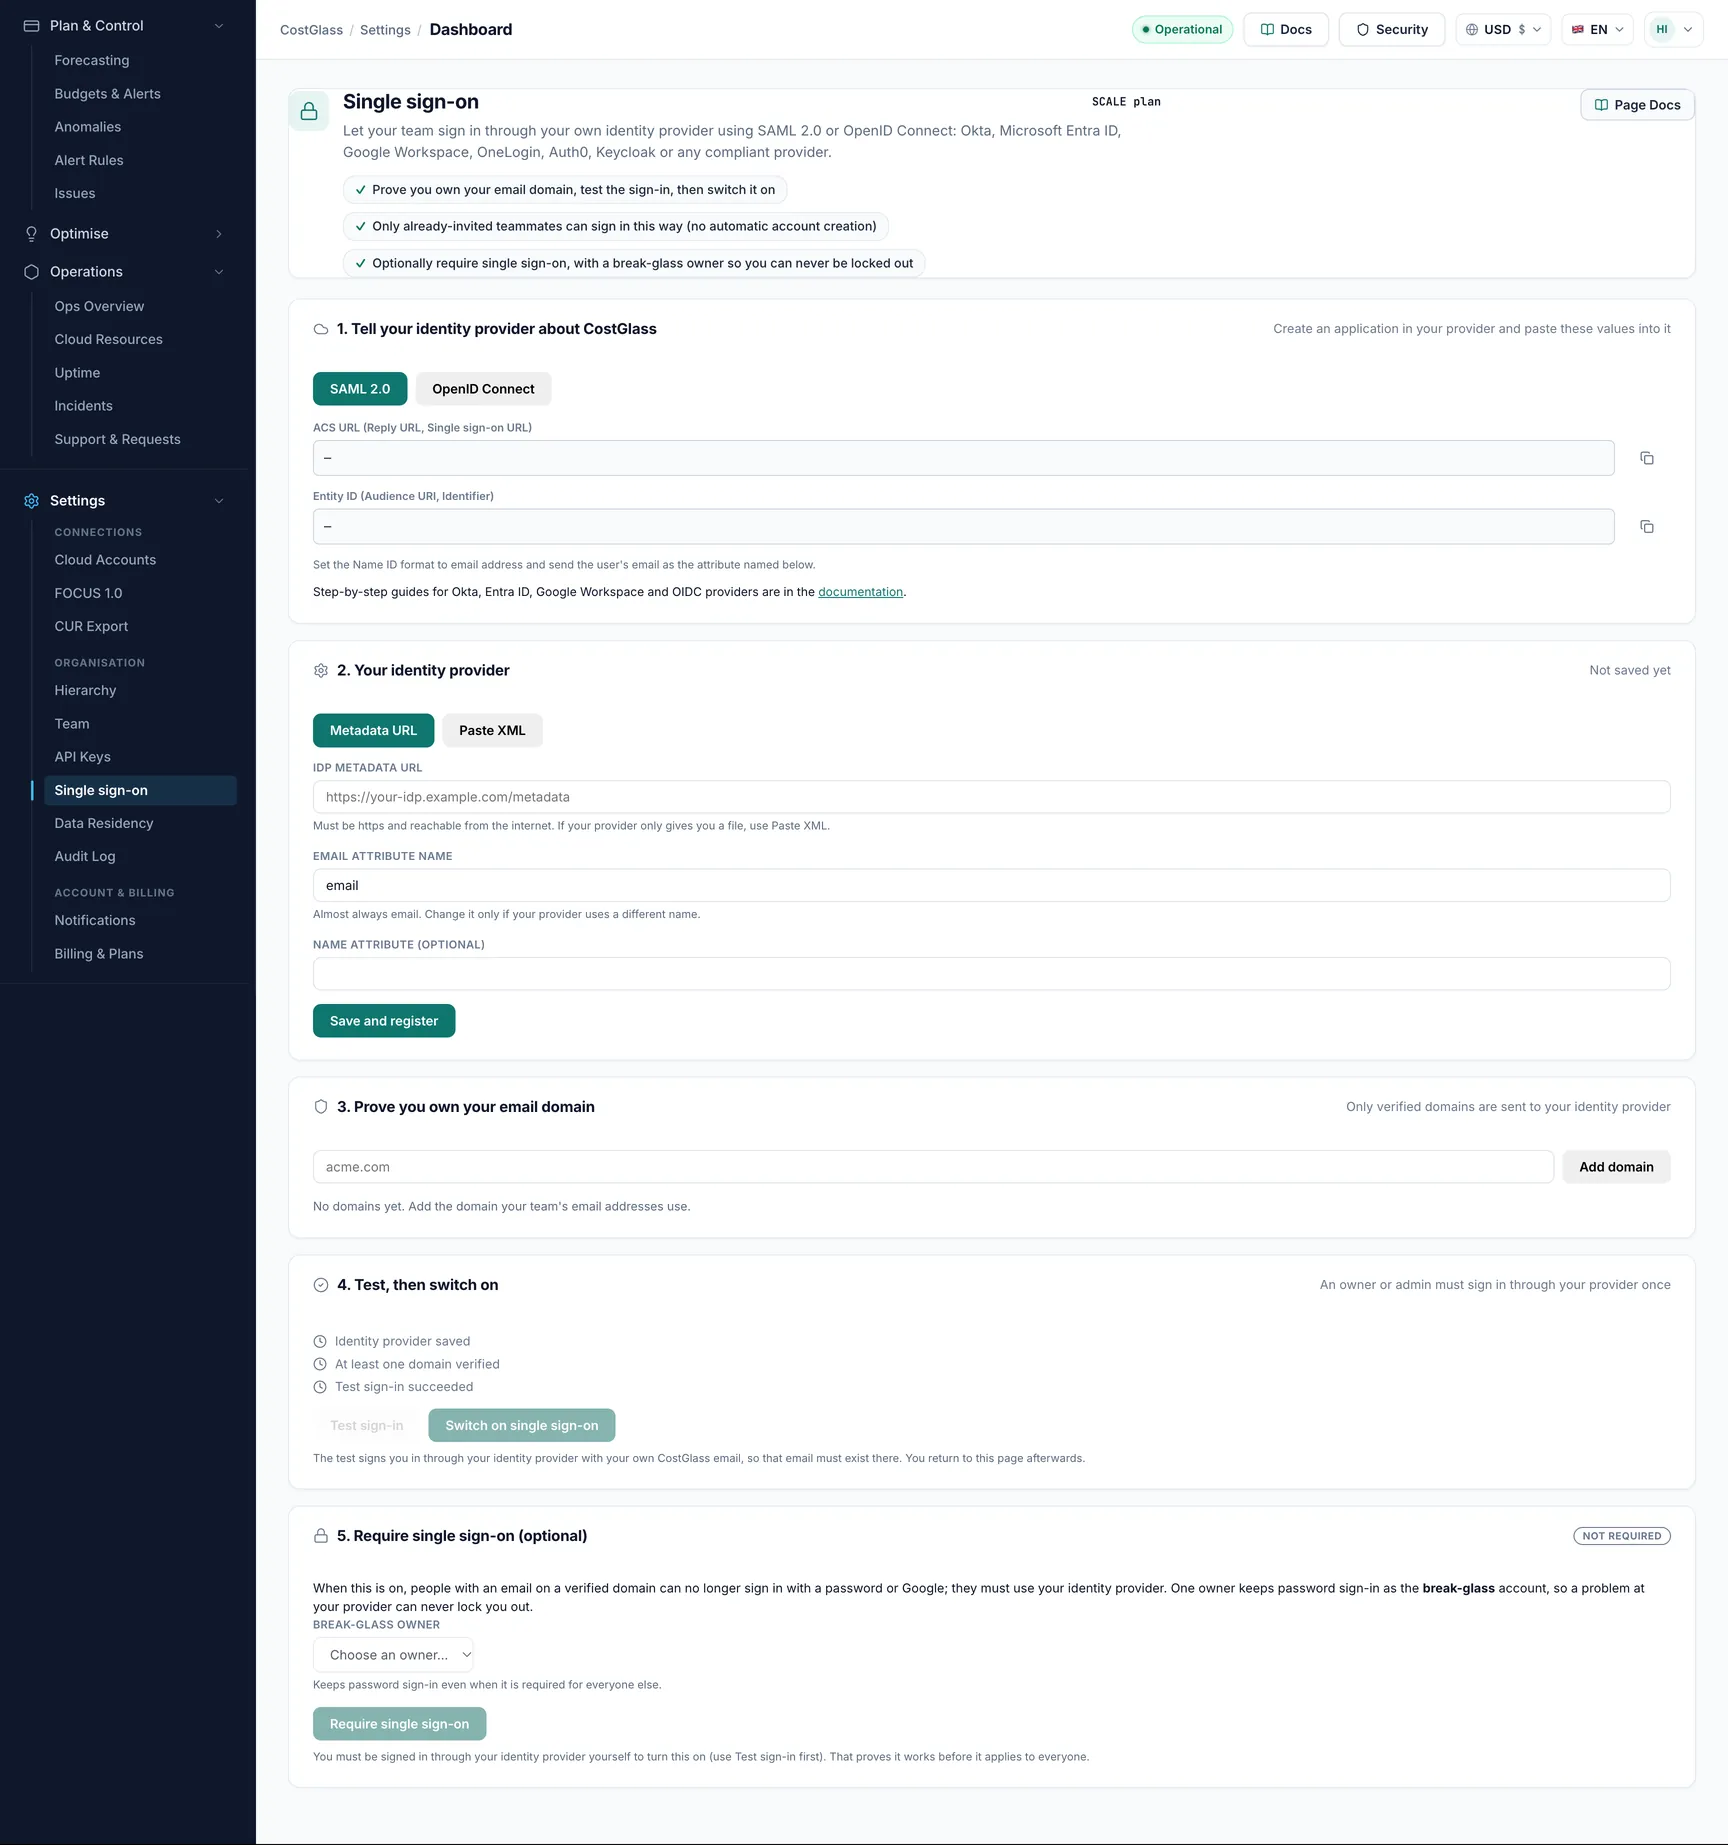
openid email profile). Click Save and register.acme.com) and click Add domain. Publish the TXT record shown at your DNS provider, then click Verify. See the next section for details.Creating the application in your identity provider
The exact menus differ by provider and change over time, so this is a map, not a script. Use your provider's own help if something has moved.
SAML 2.0 (Okta, Entra ID, Google Workspace and others)
- Create a new SAML application (sometimes called a custom or non-gallery app).
- Paste the CostGlass ACS URL into the field for the single sign-on, reply or assertion consumer service URL.
- Paste the CostGlass Entity ID into the field for the audience, identifier or SP entity ID.
- Set the Name ID format to email address, and make sure the person's email is sent as an attribute. CostGlass reads an attribute called
emailby default. If your provider sends it under another name (Microsoft Entra ID, for example, uses a long claim name), type that name into Email attribute name in CostGlass. - Assign the application to the people who should use it.
- Copy the provider's metadata URL, or download the metadata file (XML). A metadata URL must start with
httpsand be reachable from the internet. If your provider only gives you a file, use Paste XML.
OpenID Connect
- Register a web application (a confidential client using the authorization code flow).
- Add the CostGlass Redirect URI as an allowed sign-in redirect.
- Allow the scopes
openid,emailandprofile. - Collect the issuer URL (the address whose
/.well-known/openid-configurationdescribes your provider), the client ID and the client secret. - Make sure the ID token carries the person's
email. CostGlass identifies people by it.
The client secret is passed straight to the sign-in service. It is never shown again, and leaving the field empty on a later save keeps the stored one.
Proving you own your email domain
This stops another company claiming your domain. For each domain CostGlass shows a TXT record:
| Field | Value |
|---|---|
| Name (host) | _costglass-verification.yourcompany.com |
| Value | costglass-verify=<a code shown on the page> |
- Public mailbox domains such as gmail.com or outlook.com are refused, because nobody can own them.
- Only verified domains are sent to your identity provider.
- A domain can be verified by only one organisation at a time.
- Every day CostGlass re-checks the record. If it disappears you get 7 days before the domain stops being verified, and the page shows a warning with the date it went missing.
Test, then activate
Before you can switch it on, three things must be true: the provider is saved, at least one domain is verified, and a test sign-in has succeeded. The page shows each as a tick.
- Test sign-in signs you in through your IdP using your own CostGlass email. That email must exist in your IdP too. Only an Owner or an Admin can pass the test.
- You return to the page with a message that the test sign-in succeeded.
- While the status is Not switched on, only Owners and Admins can sign in through the provider, which lets you test safely.
| Status badge | Meaning |
|---|---|
| Not switched on | Saved, but not active yet, or switched off because the provider details changed. |
| On | People on your verified domains can use it. |
| On: certificate expiring | SAML only. Your provider's signing certificate expires within 30 days. |
| Needs attention | CostGlass could not register or read your provider. The page shows the reason. |
Requiring single sign-on and the break-glass owner
When you click Require single sign-on, people with an email on a verified domain can no longer sign in with a password or Google. They must use your provider.
To stop requiring it, click Stop requiring single sign-on. To remove the provider altogether, use Remove single sign-on at the bottom (your verified domains are kept).
Messages people may see
When a sign-in is refused, the person sees a message built from one of these codes:
| Code | What it means | What to do |
|---|---|---|
sso_required | Your organisation requires single sign-on and the person signed in with a password or Google. | On the sign-in page, enter the work email and choose Continue with SSO. |
sso_wrong_org | The sign-in came from a different organisation's identity provider than the one registered for this person. | Sign in through your own company provider. If you did, ask an administrator to check which provider is saved. |
sso_domain_unverified | The organisation has not proved it owns the email domain (the DNS record is missing). | An administrator opens Settings → Single sign-on, publishes the TXT record shown for the domain and clicks Verify. |
sso_not_ready | Single sign-on is saved but not switched on yet (or was switched off by a change). | An administrator completes the test sign-in and switches it on. Until then only owners and admins can sign in this way, to test it. |
sso_unknown_provider | The sign-in came from an identity provider CostGlass does not recognise. | Use the sign-in link from CostGlass, not an old bookmark. |
No organisation access | The email is not on the organisation's user list. Single sign-on never creates accounts. | An owner or admin invites the person in Settings → Team, then they sign in through the provider. |
Keeping it healthy
- Certificate expiry (SAML). Your IdP's signing certificate expires eventually. Owners are emailed 30, 14 and 3 days before. If you gave a metadata URL, CostGlass picks up a rotated certificate by itself. If you pasted XML, paste the new file. If the certificate expires, sign-in stops and the page shows Needs attention.
- Domain checks. Daily, with a 7-day grace period (see above).
- Audit trail. Changes to the provider, domains, switching on and the requirement are recorded in the audit log.
What single sign-on does not do
- It does not create or remove accounts. Invite people under Settings → Team. There is no automatic provisioning (SCIM).
- Group-to-role mapping is switched off. Roles are set only in Settings → Team, whatever groups your provider sends.
- One provider per organisation and no single sign-out (signing out of CostGlass does not sign people out of your provider).